
Sviluppo Basato su Test (TDD) nella Scrittura di Firmware
su

Il debug del firmware dopo l'implementazione può essere un incubo. Ma cosa succederebbe se fosse possibile individuare gli errori prima dell'esecuzione del codice? Questo articolo esplora lo sviluppo basato su test (TDD) per il firmware, aiutando gli ingegneri embedded ad adottare un approccio basato sui test per ottenere sistemi più affidabili e meno soggetti a bug.
Since firmware development is a branch of software engineering, it has adopted the TDD approach from software engineering, which emphasizes writing tests before the code itself. However, some firmware developers follow a Test-Later Development (TLD) approach, where testing — especially unit tests — is postponed until the code is considered functional. While this mindset may seem efficient and natural, it often leads to poor test coverage. As a result, the codebase becomes more vulnerable to integration failures when new features are introduced.
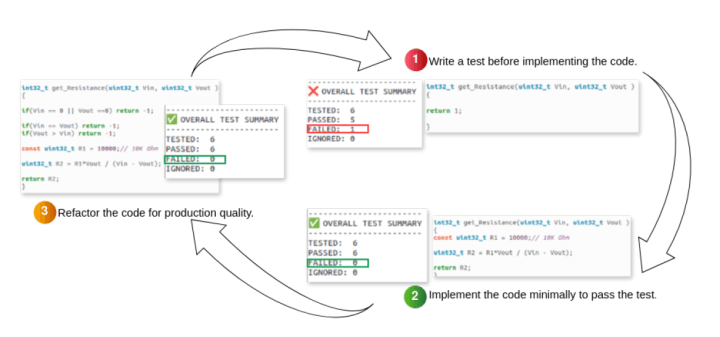
The great thing about TDD is that it ensures full test coverage when followed strictly. Developers adopt a test-first mindset, writing tests before the actual code. Initially, the test fails since no implementation exists (Red), see Figure 1. Next, the code is written to implement the unit and pass the test (Green). Finally, the code is refined and optimized while keeping the test successful (Refactor). This cycle — Red, Green, Refactor — is the core of TDD.
TDD flips the traditional firmware development process, making it seem unfamiliar and challenging at first. A common concern is how to apply unit testing to firmware running on a microcontroller, given its tight dependency on vendor SDKs and toolchains. This article explores these challenges and clarifies how TDD can be effectively integrated into embedded development.
Whether you’ve heard previously about TDD from a book, colleague, or a talk — or, if you are completely new to the concept — this article is for you.
Understanding Unit Tests in Embedded Systems
TDD cannot be introduced without a clear understanding of unit tests. While this article is not meant to teach how to write unit tests, it’s important to clarify some key terms.
The term test double is widely used in unit testing. It refers to objects that replace real system components to isolate the System Under Test (SUT) from dependencies. In embedded systems, using test doubles is essential, as dependencies on SDKs and third-party libraries can be more restrictive than in general software development. Test doubles are especially critical in off-target testing, where the host compiler (usually on a PC) is used to generate binaries, and neither the SDK nor real MCU peripherals are involved.
Test doubles come in different types, with the most common being Fakes, Stubs, and Mocks:
- Fakes provide a simplified implementation of a dependency, making testing easier. For example, replacing a NOR Flash key/value store with an in-memory key/value store on the host during off-target testing.
- Stubs return predefined, hardcoded responses with minimal logic. For example, replacing an ADC reading function with one that always returns a fixed value.
- Mocks verify interactions, ensuring functions are called with expected arguments. Unlike stubs, mocks act as spies on function calls. For example, when testing an I2C sensor driver, a mock can check if the correct register address is sent, whereas a stub would remain passive.
It’s important to note that the differences between test doubles run deeper, but if you’re unfamiliar with these concepts, this explanation should be a good starting point. Additionally, dependency replacement in C/C++ can be achieved using different test double techniques. These include: Interface-Based Replacement, Inheritance-Based Replacement, Composition-Based Replacement, Link-Time Replacement, Macro Preprocessed Replacement, and Vtable-Based Replacement. More about this here.
Unit tests require a framework consisting of a library and a test runner. The library provides assertions and support for test doubles like mocks, while the test runner executes the tests. It is worth mentioning that not all frameworks have built-in support for Mocks. The framework also manages test fixtures, typically called setup and teardown, which run before and after each test to ensure a controlled environment.
TDD in Practice
TDD follows an iterative loop:
1. Write a test before implementing the code. This ensures the function’s definition exists but lacks a body. The test suite, including previously passing tests, should run, with the new test failing initially.
2. Implement the code minimally to pass the test. This first version may not be optimal, but running the full test suite prevents regressions.
3. Refactor the code for production quality. Running tests again ensures no new faults emerge. This approach saves time compared to the later debugging approach.
We’ll use a demo project to demonstrate the TDD loop in practice. While you can use any unit testing framework, such as Unity or GoogleTest, we’ll go with Ceedling this time. Ceedling is user-friendly and comes with built-in mocking capabilities via CMock.
In this demo project, we’ll build a controllable voltage divider using a digital potentiometer, such as the AD5160, connected via SPI (Figure 2). As a first step, we can break the system into two components: one for calculating the required resistance to achieve the desired output voltage and another for sending this value to the chip over SPI. To keep the focus on demonstrating TDD, we’ll make several simplifications.

After installing Ceedling, we need to create the project using the command:
ceedling new sw_voltage_divider
Then we create a module using the command:
ceedling module:create[voltageDiv]
This module will be the application code that handles calculating the required resistance value. This will create the following directory structure.
├── project.yml
├── src
│ ├── voltageDiv.c
│ └── voltageDiv.h
└── test
└── test_voltageDiv.c
graphics team pls make sure that the special characters remain in the layout
Calculating Resistance
Our first step is to implement the code for calculating the required resistance. This will be a simple function that takes two parameters — input voltage and desired output voltage — and returns the calculated resistance value. We’ll begin by writing the first unit test to verify this function’s output. Since this test will initially fail, it marks the starting point of our TDD cycle.
// in src/voltageDiv.h
int32_t get_Resistance(uint32_t Vin, uint32_t Vout );
// in src/voltageDiv.c
int32_t get_Resistance(uint32_t Vin, uint32_t Vout )
{
return -1;
}
// in test/test_voltageDiv.c
void test_whenValidVoutAndVinProvided_
thenReturnCorrectResistance(void)
{
TEST_ASSERT_EQUAL_INT32(get_Resistance(5000,2500),10000);
// Assuming R1 must be 10 k, when Vin = 5 V and Vout = 2.5 V
}
The TEST_ASSERT... function will check that we get back 10000 in int32 format, if we call the get_Resistance function with the given parameters.
The initial implementation will calculate the resistance using the voltage division rule. This will be sufficient to pass the first test.
// in src/voltageDiv.c
int32_t get_Resistance(uint32_t Vin, uint32_t Vout )
{
return 10000*Vout / (Vin - Vout);
}
Next, we’ll refactor the code by defining R1 as a macro in the header file and adding a check to ensure Vin and Vout are not equal, preventing division by 0. Additionally, we’ll introduce guard conditions to ensure neither Vin nor Vout is 0 and that Vin is always greater than Vout. Running the unit tests will help confirm that our refactoring hasn’t introduced any errors.
// in src/voltageDiv.c
int32_t get_Resistance(uint32_t Vin, uint32_t Vout )
{
if(Vin == 0 || Vout == 0) return -1;
if(Vin == Vout) return -1;
if(Vout > Vin) return -1;
uint32_t R2 = R1*Vout / (Vin - Vout);
return R2;
}
The potentiometer driver
Now, let’s build the potentiometer driver. We’ll create a function that sets the potentiometer to the desired resistance value by sending it over SPI to the chip. The corresponding unit test will verify this behavior, and as expected in TDD, the test will initially fail on the first run. Let’s create a module for it using ceedling module:create[AD5160].
// in src/AD5160.h
uint8_t pot_set(uint32_t res_value);
// in src/AD5160.c
uint8_t pot_set(uint32_t res_value)
{
return 0;
}
// in test/test_AD5160.c
void test_AD5160_SetResistanceViaSpi(void)
{
TEST_ASSERT_EQUAL_INT8(pot_set(5000),1);
}
During normal operation, the pot_set function will return 1 to confirm that the potentiometer was successfully set; this is checked by the TEST_ASSERT... function. As you can see, the initial test will fail.
The basic implementation of the pot_set function involves selecting the appropriate number of steps for the digital potentiometer to achieve a resistance value close to the desired one. Since this would require an SPI transfer with actual hardware, we’ll use a mock to replace this actual SPI transfer while running the tests. In Ceedling, this is done by calling spi_transfer_ExpectAndReturn before the assertion that tests pot_set. All we need to do is include the spi_transfer declaration in SPI.h.
// in test/test_AD5160.c
void test_AD5160_SetResistanceValue(void)
{
spi_transfer_ExpectAndReturn(128,1);
// SPI Mock used inside pot_set
TEST_ASSERT_EQUAL_INT8(pot_set(5000),1);
}
// in src/AD5160.c
uint8_t pot_set(uint32_t res_value)
{
uint8_t step = 10000/256;
uint8_t D = res_value / step;
return spi_transfer(D);
}
Finally, we can refactor the code by adding macro definitions and implementing a check to ensure the required resistance does not exceed the potentiometer’s maximum value.
uint8_t pot_set(uint32_t res_value)
{
if(res_value > R2_MAX) return 0;
uint8_t D = res_value / POT_RESOLUTION ;
return spi_transfer(D);
}
To view the full source code for the demo project, visit the GitHub repository.
Evaluating the Efficiency of TDD
Like any engineering approach, TDD isn’t always the optimal solution for every scenario. However, even if not fully applied, its principles can greatly influence the way we think about software development. TDD offers significant benefits, such as:
- TDD encourages modularity and dependency isolation, which are essential for effective unit testing. As a result, your code becomes well-structured and portable. For example, it discourages mixing application logic with direct hardware interactions, even in the name of efficiency.
- The TDD iteration keeps developers focused on one issue at a time while emphasizing external behavior and interface design to create effective unit tests.
- Running unit tests at each step helps quickly localize errors and provides immediate feedback.
- TDD enables development to begin even before the target hardware is available by using mocks to simulate hardware components, allowing testing and validation early in the process.
- TDD allows development to proceed independently, even if colleagues haven’t finished their parts. For example, if a driver is still under development, you can use mocks to simulate its behavior.
- The TDD iteration benefits developers by ensuring steady development. Having one or more unit tests covering a feature confirms its successful implementation.
One of the few scientific studies on applying TDD in embedded software development, “Test-Driven Development and Embedded Systems: An Exploratory Investigation," examined its impact on software quality and developer productivity. In the study, nine Master’s students implemented trial projects using both TDD and non-TDD approaches. The results showed an increase in external quality but no significant difference in productivity. While this study doesn’t provide a definitive answer, its findings are worth noting.
There’s no need to highlight the obvious challenges of TDD, such as the extra code required for unit tests and the effort needed to replace dependencies with test doubles like mocks, which can sometimes be complex. The decision to use TDD should always weigh the added effort against its potential benefits.
Finally, it’s worth mentioning that TDD is a development methodology, not an implementation strategy — it won’t teach developers how to structure or architect their code. TDD aligns with Agile, particularly Extreme Programming (XP), which advocates frequent releases in short development cycles and includes a test-first approach. However, TDD itself is not exclusive to XP. Additionally, it’s important to note that unit tests written during TDD should be complemented by system and integration testing.
On-Target vs. Off-Target Testing: Which One to Choose?
Off-target and on-target testing refer to where tests are executed (see Figure 3). Off-target testing runs on the host machine used for firmware development, while on-target testing runs directly on the hardware that will execute the final firmware. This involves running unit tests on the target hardware while relaying test results to the host, typically through UART logs or a similar communication protocol.
Some may argue that off-target TDD is inefficient for testing real hardware functionality, and while this is partially true, it highlights the need for on-target or dual-target testing in some cases. However, off-target TDD can be crucial in scenarios where hardware failures are difficult to trigger or reproduce. For example, when developing a flash memory driver, testing failure cases like SPI bus errors or flash memory faults is challenging because the hardware typically operates correctly under normal conditions.

On-target testing may seem more preferred and realistic, but there are cases where off-target testing is more practical:
- Target is still under development and not yet ready for use.
- Limited memory space on the target prevents running all unit tests.
- No debugging ports or a proper output interface to display test results.
- Limited hardware availability, making it difficult for all team members to test.
- Certain errors (e.g., bus errors) cannot be reliably triggered on real hardware.
- The test suite is taking too long due to the time required for flashing binaries and retrieving test results.
In such cases, off-target TDD helps maintain development momentum while periodic or partial on-target testing could be done when needed, referred to as dual-target.
Some developers think unit test frameworks like Unity work only on the host, but that’s not true. Unity can be adapted to run directly on the target, with test results printed via interfaces like UART. However, on-target testing is harder to automate.
On the other hand, off-target testing carries risks, such as differences between the host and target compiler toolchains. For example, an int is typically 4 bytes on most ARM Cortex-M targets but can be 4 or 8 bytes on x86-64. A great way to get the best of both worlds is to apply TDD while running the code with the target’s toolchain in a fast and seamless manner using emulators like QEMU.
TDD Through the Eyes of the Firmware Developer Community
Gathering insights from the developer community provides valuable feedback. Online platforms like Reddit offer a way to hear from industry professionals, including those from companies that typically don’t disclose their use of TDD. Since anonymous employees often share real-world experiences, I’ve selected a few opinions worth highlighting, without adding personal judgment.
One developer believes TDD is totally worth it, acknowledging that it may feel uncomfortable at first and isn’t the fastest way to develop software. Another emphasizes that with proper mocking and faking, unit testing can be done with zero hardware interaction.
Another developer expressed resistance to TDD, especially in projects with many unknowns that only become clear during development. In their view, this leads to wasted time deleting and adapting tests. They described a common approach: prototyping the code until it reaches a stable state with successful high-level functional or integration tests. Only then do they aggressively refactor and add unit tests to key areas that won’t change frequently.
Another useful TDD use case mentioned by a developer is in multi-stage signal analysis algorithms, making each stage testable separately. Additionally, the unit tests resulting from following TDD can help detect rare issues on the host, such as hardware failures and timing problems, which might be difficult to reproduce on the actual hardware.
The Bottom Line
Some advocate TDD without addressing its pros and cons, while others reject it entirely. However, learning and experimenting with TDD can enhance development practices even if not followed strictly. TDD is particularly useful for large projects with multiple team members and complex functionality, but it also benefits smaller teams and projects.
Developers who resist TDD may struggle with firmware architecture design or writing effective test cases. Actually, a lot of the misunderstandings about TDD may come from a lack of experience in strong writing unit tests. Approaches like “test interface, not implementation” and Behavior-Driven Development (BDD) can help minimize redundant test rewriting. Additionally, mutation testing evaluates test quality by introducing small code changes and checking if tests detect them.
Finally, the usual further reading recommendation is the foundational James Grenning’s book Test-Driven Development for Embedded C, which, at the time of writing this article, is the only book specifically focused on applying TDD in embedded systems. Additionally, I recommend reading the book chapter “Test-Driven Development as a Reliable Embedded Software Engineering Practice” from Embedded and Real-Time System Development: A Software Engineering Perspective, a book which provides an in-depth explanation of TDD in embedded systems and suggests valuable enhancements to it. A vast number of resources were used to prepare this article and are listed in a GitHub README file for space-saving purposes.
Editor's Note: This article (250092-01) appears in Elektor September/October 2025.
Questions About Firmare or TDD?
Do you have technical questions firmware development or about his article? Email the author at yt@atadiat.com or Elektor at editor@elektor.com.


Commenti (0 commenti)